Docker allows for a easier setup of configured tech stacks without worrying about setup or dependencies in a container . It helps with compatibility issues with different OS. Main purpose of docker is allow developers to package and containerized applications and to ship them and to run them anywhere.
Docker
Image
Image contains all the dependencies and configurations that is required to run a program. An instance of an image will run in a docker container. An example of an image can be almost anything; a custom service that you created, redis, nodejs, postgres. Most of the common popular images can be pulled from the docker registry
VMs vs Containers
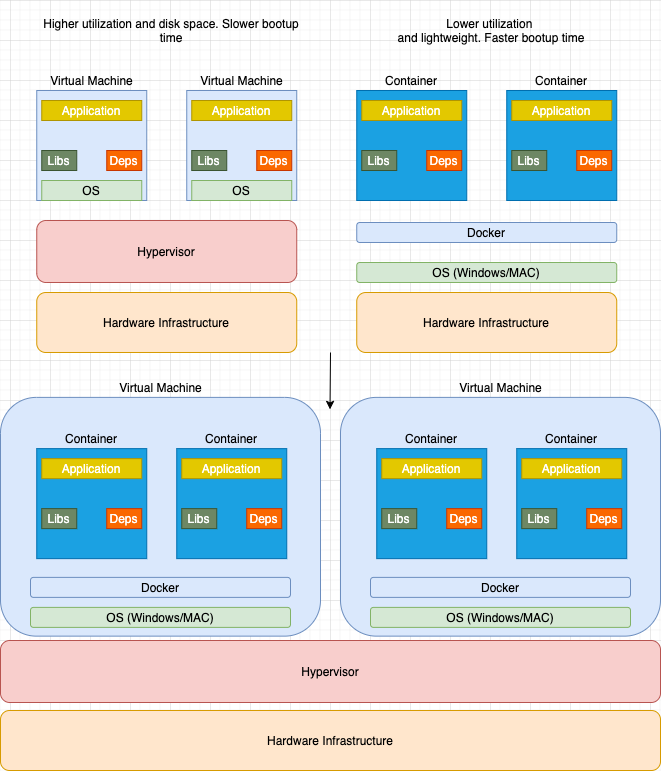
- Virtual Machines(VM)
- Has a higher utilization load on the underlying hardware. It takes longer to bootup and takes up larger disk space on your hard disk. Each VM has its own guest OS aboe the host OS which makes them heavy. Suited when you want run applications or servers that required you to run on different OS flavours.
- Containers
- Containers has lower utlilzation load. Lightweight. Easy to provision new applications and has way faster bootup time. Lower disk space. Sharing the host operating system between containers make them very light and helps them to boot up in just seconds. They are suited when you want to run multiple applications over a single OS kernel.
- Containers has lower utlilzation load. Lightweight. Easy to provision new applications and has way faster bootup time. Lower disk space. Sharing the host operating system between containers make them very light and helps them to boot up in just seconds. They are suited when you want to run multiple applications over a single OS kernel.
Note
It’s not either container or virtual machine choice. It’s both container and VMs as per the image above. Imagine when we have a large environment with thousands of application containers running on thousand of docker hosts, You will often see containers provisioned on virtual docker hosts.
That way we can utilize the advantages of both technologies we can use the benefits of virtualization to easily provision or decomission docker hosts as required at the same time make use of the benefits of docker to easily provision applications and quickly scale then as require
We will not be provisioning as many virtual machines as before, Previously we would have provision a virtual machine for each application, Now we can provision a single virtual machine for hundres or thousand of docker containers which make it very efficient
Snippets and scenarios with docker
- docker run
-> run an image in a container. If image not existing, it will download/pull from docker registry
When you run an os image in a container docker run centos. It will first check if the image exist locally, if not it will pull the docker image from the registry. It will then exit. You can verify this by using command docker ps -a. You will notice that hte status is exited. This is because we are not running any application or service, the docker container will only last until the last runnable application/service
To ensure the container does not get killed, use the command docker run -it centos bash. This will the bash terminal in the container and you’re able to browse through the file directory as per normal
- docker pull
-> pulls the image and stores locally - docker exec
cat /etc/hosts -> execute command on a container
- docker run
sleep 100 -> run an image in a container. Wait for 100 seconds and then exits - docker run -d simple-webapp - runs application in the background
- docker ps -> list all running containers
We can run a docker command in the background to verify a running container docker run -d centos sleep 20. This will run the pulled centos image in a container in the background. Sleep for 20 seconds. When it is sleeping, you will have control of the terminal, where you can run docker ps and see the running container ID, status and name
- docker ps -a -> list all containers
-
docker stop <container-id/name> -> stop a container Statuses of containers will be
exited(0)when it naturally exits. If we force stop or kill through thedocker stop <container-id/name>command, it will beexited(137) -
docker rm <container-id/name> -> remove a container You are able to provide multiple container-id/names in one docker command
-
docker images -> List all images in local
-
docker rmi
-> remove an image. Ensure to delete all dependent containers to remove an image
To run a commmand on a running container
- Pull down an image with
docker pull ubuntu - Run image in a container in the background with sleep
docker run -d ubuntu sleep 1000 - List all running container
docker psand get container ID - Run command with
docker exec <container-id> cat /etc/hosts
Docker run advanced
docker run redis:4.0-> pull version 4.0 of redis, otherwise docker will pull the latest tag from the registrydocker run -i webapp-> runs interactivelydocker run -it webapp-> runs in pseduo terminal mode interactively
Port mapping
docker run -p 80:5000 webapp-> maps the docker host port 80 to container’s port 5000docker run -p 8000:5000 webapp-> maps the docker host port 8000 to container’s port 5000docker run -p 8001:5000 webapp-> maps the docker host port 8001 to container’s port 5000docker run -p 3306:3306 mysql-> maps the docker host port 3306 to container’s port 3306docker run -p 8306:3306 mysql-> maps the docker host port 8306 to container’s port 3306 We are able to run multiple containers on the same port 5000 as long as we map it to another opening port of the docker host
Volume mapping Docker container has its own isolated file system and any changes will only happen to that container If you have logs stored in a container, once the container gets removed, all the data goes away
If you want to persist data you would want to map a directory outside of the directory on the Docker
docker run -v /opt/datadir:/var/lib/mysql sql-> maps the docker host folder/opt/datadirto the container’s/var/lib/mysqlSo when the docker container runs, it will implicitly mount the external directory to a folder inside the docker container. So when the container do get removed/exited, logs are still persisted in the external directory
Inspect Container
docker inspect <container_id/name>-> find details of the container
Container logs
- If you have ran a container in detached mode for a simple web app
docker run -d webapp. You are able to view logs of the application stdout by using commanddocker logs <container_id/name>
To look at a pulled linux OS version in a container
docker pull ubuntudocker run -it ubuntu bashrun a bash terminal interactively in ubuntu container. You can check for the os version in the fileos-releasein directory/etc- You can exit out of the terminal by
exit - Now you know the location of the file we can run it directly from the docker command
docker run ubuntu cat /etc/os-release
docker run -d timerwill run timer image in a container detached mode and prints out date every second in stdoutdocker psto check all running containersdocker attach <continer_id/name>to get back into the container loop and prints out date every second in stdout
Example of jenkins data being persisted in machine by using volume mapping
docker pull jenkins/jenkinsdocker run -p 8080:8080 jenkin/jenkins- Run jenkins image in a container without volume mapping. When you head to external Ip:8080. For me that will be localhost:8080. You have to do the initial setup and install plugins. When you quit/exit out of the running container, all that data will not be persisted.docker run -p 8080:8080 -v ~/my-jenkins-data:/var/jenkins_home jenkins/jenkins- All data and plugins installed will be persisted. So on subsequent running of the container, you are able to use the data installed
Creating your own docker image
Containerizing a simple node application
- Think of the manual steps to run the applcation and ship it
- Have a source OS - Ubuntu or a built image with all the dependencies installed like Node
- Update apt repositories
- Install dependencies using apt
- Install Node dependencies using npm install
- Copy source code to /opt folder
- Run the web server using the node command
- Create a dockerfile with the instructions written above
Dockerfile -> A INSTRUCTION to ARGUMENT formatted file
When docker builds these instructions, it builds a layered architecture, each line of instruction creates a new layer in the docker image with just the changes from the previous.
Each layer only store changes from the previous layer and it is reflected in the size by running the docker history <image-name>
All the layers build are cached so the layered architecture helps you restart docker build from that particular step in case it fails or if you add in new steps/process, you wouldn’t have to start
all over again. Rebuilding entire image will be faster
FROM node:12 -> Layer 1. start from a base OS or another image
WORKDIR /usr/src/app -> Layer 2. install all dependencies
COPY package*.json ./ -> Layer 3. Copy only the package.json
RUN npm install -> Layer 4. Run npm install
COPY . . -> Layer 5. Copy over source code
EXPOSE 5000 -> Layer 6 Expose port this container will be running on
CMD [ "node", "server.js" ] -> Layer 7 Specific entrypoint. Entry point allows us to specify a command that will be run when the image is run as a container
- Build image with command
docker build -t yaminmhd/simple-node-webapp . - After building the image, run the container with
docker run -p 9000:5000 -d yaminmhd/simple-node-webapp - Verify container is running with
docker ps - Verify endpoint is working by doing a
curl http://localhost:9000. This will return Hello World - Push image to the docker registry
docker push yaminmhd/simple-node-webapp
Environment variables
For setting environment variables when running a docker container
In the dockerfile, environment variables can be fetched through os.environ.get('COLOR')
- We can set the COLOR environment variable using
EXPORT COLOR=bluein the terminal - After building the docker image, we can run the container with environment variable by setting in the command
docker run -e COLOR=blue <name of image>- To inspect environment variable in a container use
docker inspect <container_name>
Aside
- Run a container named blue-app using image yaminmhd/simple-webapp and set the environment variable APP_COLOR to blue. Make the application available on port 38282 on the host. The application listens on port 8080.
docker run -p 38282:8080 -e APP_COLOR=blue -n blue-app yaminmhd/simple-webapp
- Deploy a mysql database using the mysql image and name it mysql-db. Set the database password to use db_pass123. Lookup the mysql image on Docker Hub and identify the correct environment variable to use for setting the root password.
docker run --name mysql-db -e MYSQL_ROOT_PASSWORD=db_pass123 mysql
Command vs Entrypoint
-
Running a docker container with the ubuntu image
docker run ubuntu. This will exit immediately -
Containers are not meant to run operating systems. It is meant to run a specific task or process such as to host an instance of a web server or database server
-
Once the task is complete, the continaer will exit. The container will only live as long as the process inside it is alive
-
If the web service in the container crashes/exits, the container will exit
-
Let’s take a look at the example of the command above for ubuntu, looking at the
Dockerfilethere is a CMD instruction at the end of the fileCMD ["/bin/bash] -
The reason the container still exits is because when docker creates an instance of the image in a container, it does not attach a terminal to the container, so when the container was created, the container will exit immediately
Specify a different command to start the container
- Append the command to the docker run command
docker run ubuntu sleep 5 - To make this permanent, we will need to edit the Dockerfile and create a new image
FROM ubuntu
...
...
CMD sleep 5
Two ways to use the CMD instructions CMD command param1 -> CMD sleep 5 CMD [“command”, “param1”] -> CMD [“sleep”, “5”] Ensure the first value in the array is an executable. Command and parameters should be separate elements in the list
-
We can create a new image based on the new Dockerfile call ubuntu-sleeper
docker build -t ubuntu-sleeper . -
Running
docker run ubuntu-sleeper. This will always run the image in the container and sleep for 5 seconds -
But what if we need a different value provided to the sleeper, we can append the value in the docker run command
docker run ubuntu-sleeper sleep 10 -
Instead we should use
ENTRYPOINT, the entry point instruction is like the command instruction as in you can specify the program that will be run when the container starts and whatever you specify on the command line
FROM ubuntu

ENTRYPOINT ["sleep"]
and when you run docker run ubuntu-sleeper 10. This will be the command at startup docker run ubuntu-sleeper sleep 10
-
Difference between CMD and ENTRYPOINT, is that command line parameters passed in will replace entirely the values in the CMD instruction, whereas the command line parameters are appended to the ENTRYPOINT instruction
-
What if we run
docker run ubuntu-sleeperwith no parameters, how to do we configure a default value if one was not provided at the command line? We can use bothCMDandENTRYPOINTin theDockerfile
FROM ubuntu

ENTRYPOINT ["sleep"]

CMD ["5]
This will be the command at startup sleep 5
So when you provide a value at command like docker run ubuntu-sleeper 10 it will be sleep 10
To override the entrypoint instructions we can use docker run --entrypoint sleep2.0 ubuntu-sleeper 10. Final command will be sleep2.0 10
Docker compose
- Docker compose files are created using YAML syntax -
docker-compose.yml - Run docker compose file using
docker-compose build&&docker-compose up
version: "3"
services:
 db:
  environment:
   POSTGRES_PASSWORD: mysecretpassword
  image: postgres
 wordpress:
  image: wordpress
  links:
  - db
  ports:
  - 8085:80
Docker networking
There are 3 networks in Docker
-
Bridge
- All container will have a default IP of
172.17.0.0/24 - All containers in this network will be able to communicate to each other
- To access this interface on the outer hosts, we need to map the port to outer docke hosts
- All container will have a default IP of
-
Host
-
None
-
List all networks
docker network ls -
Inspect network
docker network inspect <network-id> -
Create new network
docker run -d --name mysql-db --network=wp-mysql-network -e MYSQL_ROOT_PASSWORD=db_pass123 mysql:5.6